**Aviso! hay que hacer una soldadura ultra pequeña en la placa, solo aptos para soldadores profesionales. Toda la responsabilidad de que dejéis la placa como un ligero pisapapeles recae en vuestras manos.
El tutorial está inspirado de los comentarios y reviews de aqui:
http://www.hobbyking.com/hobbyking/stor ... oller.html

1) Hacer un puente entre la patilla 60 (BOOT0)y 64 (VDD) del microcontrolador STM32F405. Recomiendo usar un calbe superfino de menos de 0.5 mm estilo wire-rap. No hace falta decir que es importante no cruzar ninguna otra patilla, etc, aseguraos con el multímetro, bla bla.
De esta manera ponemos el micro en modo DFU

2) Instalamos y configuramos los drivers con Zadig: http://zadig.akeo.ie/
Aquí está el tuto. https://github.com/betaflight/betafligh ... Betaflight
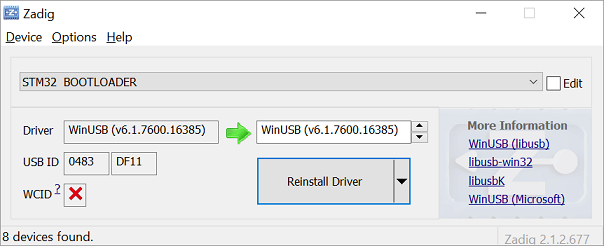
DFU flashing under Windows:
1. Download Zadig: http://zadig.akeo.ie/
2. Put device in DFU mode.
3. Open Zadig.
4. Options > List All Devices
5. Click on the drop bown box and click the device listed STM32 BOOTLOADER Zadig Screenshot
6. In the box to the right of the green arrow, select WinUSB (v6.1.7600.16385)
7. Click Install Driver
3) Instalar los Drivers necesarios para que el GUI de Betaflight pueda ver la placa correctamente (hacer todos los pasos!):
4) Abrimos Betaflight GUI ver 1.8.3 (última) --> Flashing --> Seleccionamos TODO (todo enables) menos "manual baudrate"Installing STMicro Virtual Com Port (VCP) Driver under Windows:
Many of the F4 boards (REVO, ALIENFLIGHTF4, BLUEJAYF4), and some F3 boards (SPRacingF3EVO, STM32DISCOVERY) utilise the STM32 Virtual Com Port (VCP) - a CDC serial implementation. This allows the UARTs on board to be utilised whilst the USB is connected. This requires the STM VCP driver to be installed so that the VCP to be recognised as an additional comm port on the PC. NOTE: this is similar to installing a USB serial driver, e.g. FTDI or SiLabs
The STM32 VCP driver can be downloaded here --> http://www.st.com/web/en/catalog/tools/PF257938
NOTE: Once you download and run the installation it has not installed the driver, merely unpacked the choice of drivers. Locate the installation directory and then run the EXE file pertaining to your system.
e.g. C:\Program Files (x86)\STMicroelectronics\Software\Virtual comport driver\Win8\ <- will have two files present. One for 64 bit systems and one for 32 bit systems.
5) Cargar Betaflight3.0 (betaflight_3.0.0_REVO.hex): https://github.com/betaflight/betaflight/releases
6) Conectar la FC al USB del PC. Veréis que no parpadea nada, no os asustéis, es buena señal. Si parpadea algo es que no estáis en DFU mode.
7) FLASH!
En ese momento veréis que empieza a parpadear unos leds. Dejad que acaben de parpadear. La barra de progreso de Betaflight GUI llega a su fin. Success!!
8) Si todo ha ido bien desconecta la placa --> Quítale el cable que hace de puente entre las patillas 60 y 64. --> Abre de nuevo el GUI y Connect
9) A configurar!!
NOTAS:
**Volver a flashera: Escribe dfu en el CLI y ya puedes volver a flashear (no hace falta volver a soldar el micropuente).
**A veces al hacer un reboot no se hace solo, hay que volver a conectar manualmente.